Exograph at the Edge with Cloudflare Workers

We are excited to announce that Exograph can now run as a Cloudflare Worker! This new capability allows deploying Exograph servers at the edge, closer to your users, and with lower latency.
Cloudflare Workers is a good choice for deploying APIs due to the following characteristics:
- They scale automatically to handle changing traffic patterns, including scaling down to zero.
- They have an excellent cold start time (in milliseconds).
- They get deployed in Cloudflare's global network, thus the workers can be placed optimally for better latency and performance.
- They have generous free tier limits that can be sufficient for many applications.
With Cloudflare as a deployment option, a question remains: How do we develop backends? Typical backend development can be complex, time-consuming, and expensive, requiring specialized teams to ensure secure and efficient execution. This is where Exograph shines. With Exograph, developers:
- Focus only on defining the domain model and authorization rules.
- Get inferred APIs (currently GraphQL, with REST and RPC coming soon) that execute securely and efficiently.
- Use the provided tools to develop locally, deploy to the cloud, migrate database schemas, etc.
- Use telemetry to monitor production usage.
Combine Cloudflare Workers with Exograph, and you get cost-effective development and deployment.
In this blog, we will show you how to deploy Exograph backends on Cloudflare Workers and how to use Hyperdrive to reduce latency.
A taste of Exograph on Cloudflare Workers
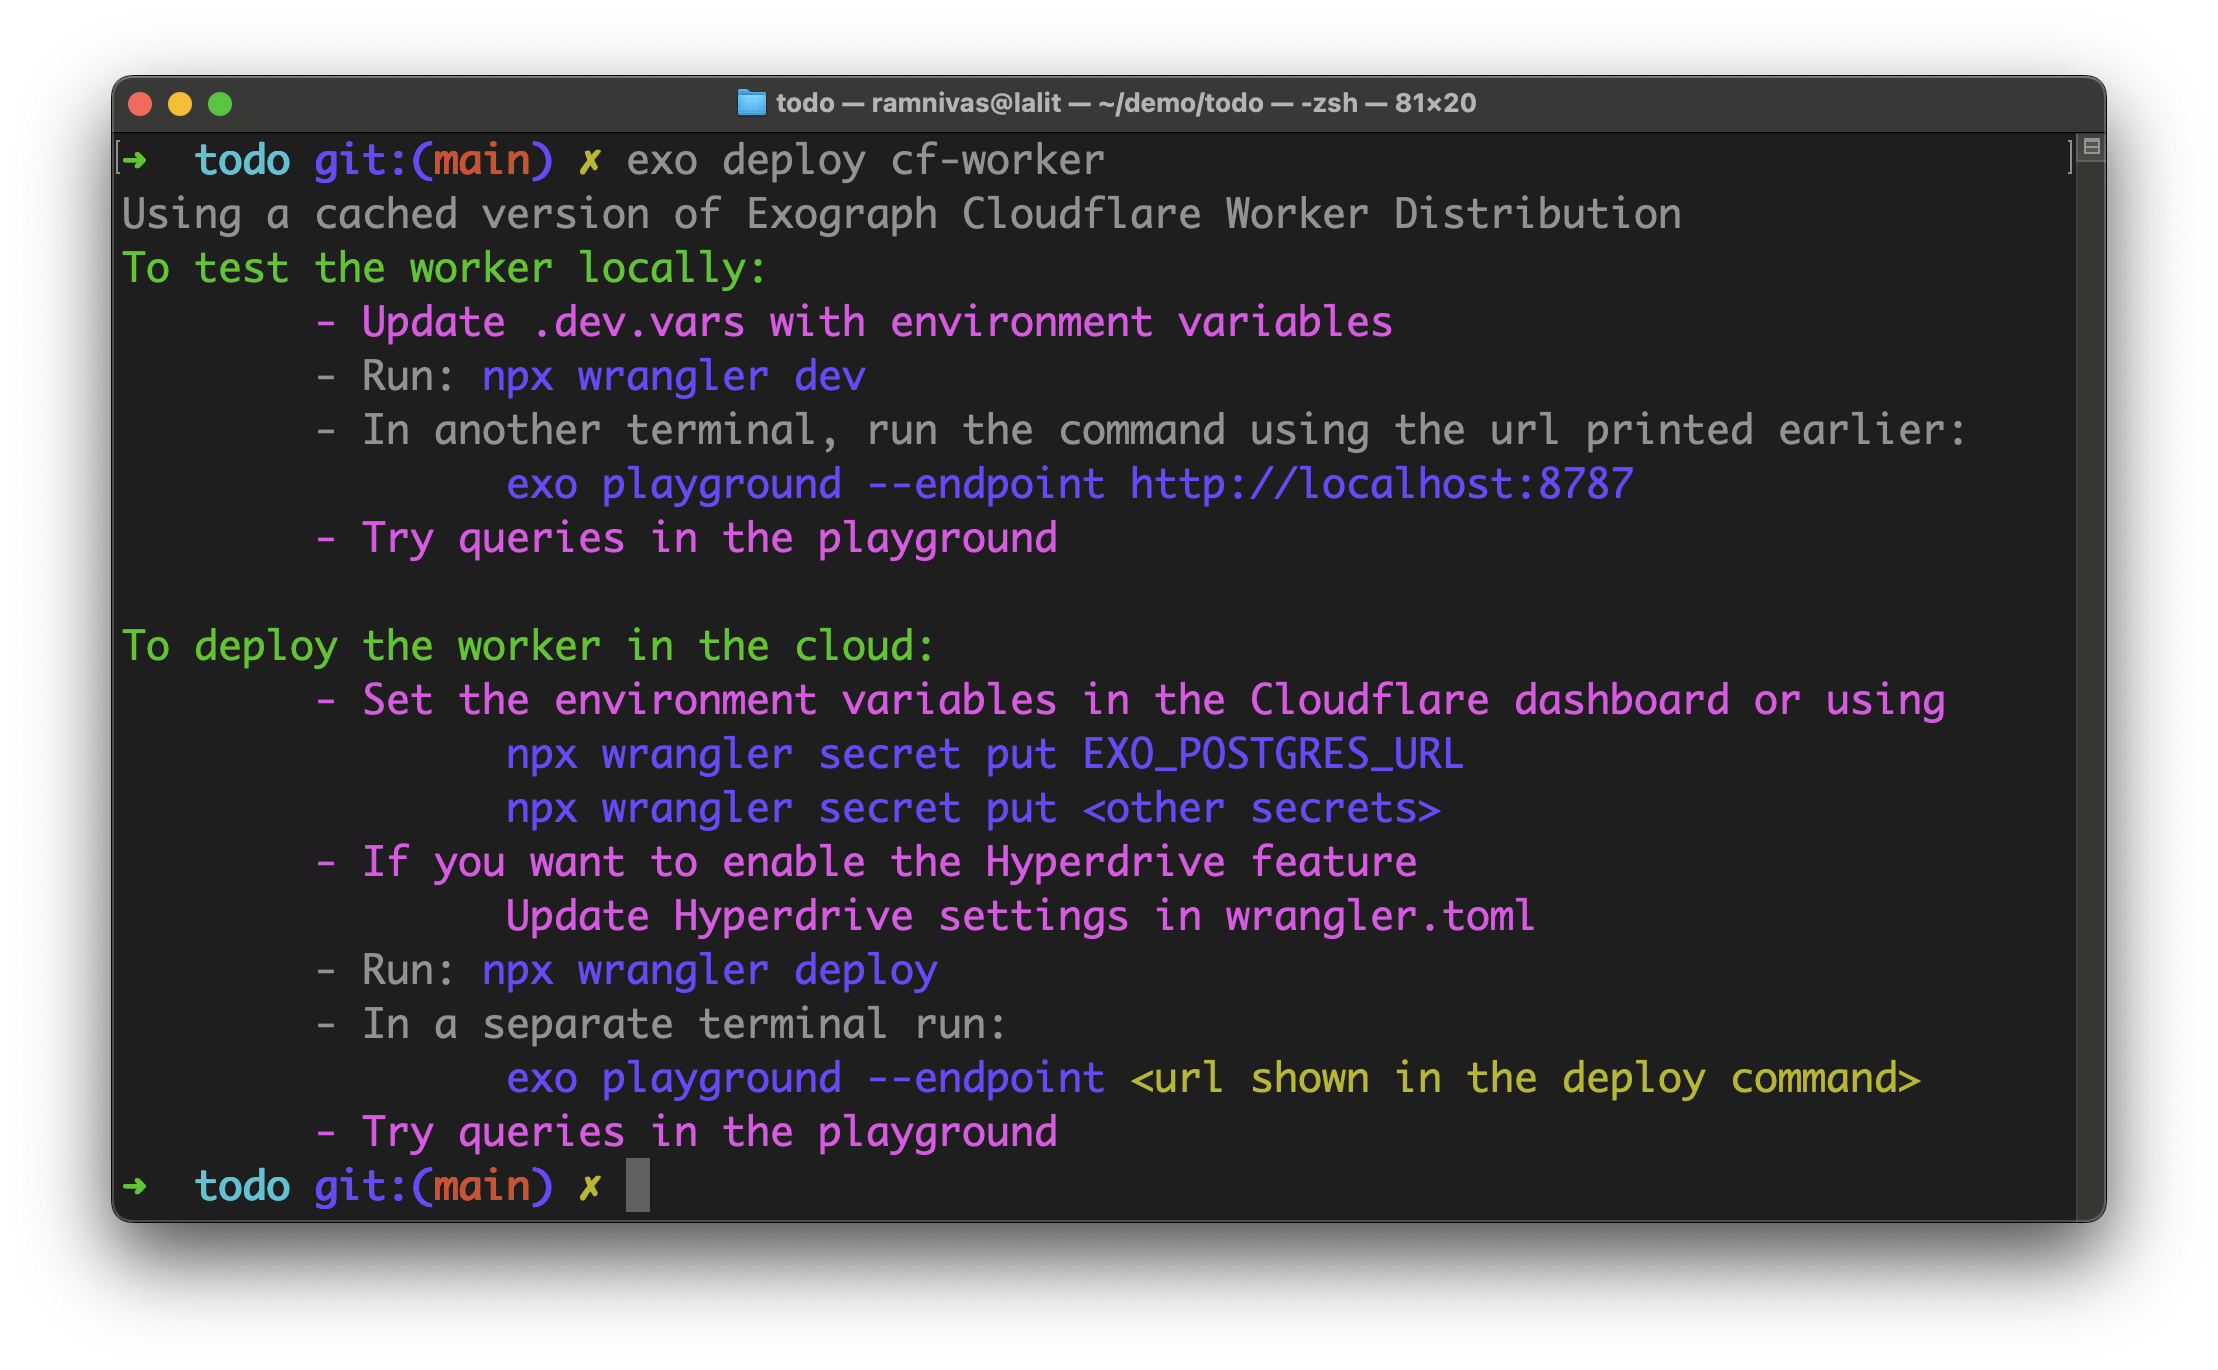
Exograph provides a CLI command to create a WebAssembly distribution suitable for Cloudflare. It also creates starter configuration files to develop locally and deploy to the cloud.
The command will provide instructions for setting up the database connection. You can create a new database or use an existing one and add its URL as the EXO_POSTGRES_URL secret. Cloudflare Workers also integrate with databases such as Neon to add this secret through Cloudflare's dashboard.
To run the worker locally, you can use the following command:
npx wrangler dev
...
Using vars defined in .dev.vars
Your worker has access to the following bindings:
- Vars:
  - EXO_POSTGRES_URL: "(hidden)"
  - EXO_JWT_SECRET: "(hidden)"
⎔ Starting local server...
[wrangler:inf] Ready on http://localhost:8787
And when you are ready to deploy to the cloud, run:
npx wrangler deploy
...
Uploaded todo (2.19 sec)
Published tod (0.20 sec)
  https://todo.<domain>.workers.dev
...
Please see the Exograph documentation for more details.
Using Hyperdrive to reduce latency
Let's measure the latency of the request with a query to fetch all todos. Here, we have deployed the worker that connects to a Postgres database managed by Neon.
oha -c 1 -n 10 -m POST -d '{ "query": "{todos { id }}"}' <worker-url>
  Slowest:      0.5357 secs
  Fastest:      0.2436 secs
  Average:      0.2872 secs
The mean response time of 287ms is good but not stellar. The main reason for increased latency is that the worker has to open a new connection to the Postgres database for every request. If connection establishment time is the problem, connection pooling is a solution. For Cloudflare Worker, connection pooling comes in the form of Hyperdrive.
To use this connection pooling option, you create a Hyperdrive using either the npx wrangler hyperdrive create command or the Cloudflare Worker's dashboard. Then add the following to your wrangler.toml:
EXO_HYPERDRIVE_BINDING = "<binding-name>"

[[hyperdrive]]
binding = "<binding-name>"
id = "..."
The worker will now use Hyperdrive to manage the database connections, significantly reducing the latency of the requests. Let's measure the latency again:
oha -c 1 -n 10 -m POST -d '{ "query": "{todos { id }}"}' <worker-url>

  Slowest:      0.3588 secs
  Fastest:      0.0879 secs
  Average:      0.0967 secs
Much better! We have reduced the mean response time to 97ms, significantly faster than the previous 287ms.
How does it work?
Cloudflare Worker is, at its core, a V8 runtime capable of running JavaScript code. V8 also supports JavaScript loading and executing WebAssembly modules. To make Exograph run on Cloudflare Workers, we compiled Exograph to WebAssembly. Currently, Rust has the best tooling to target WebAssembly. Here, our decision to implement Exograph in Rust paid off!
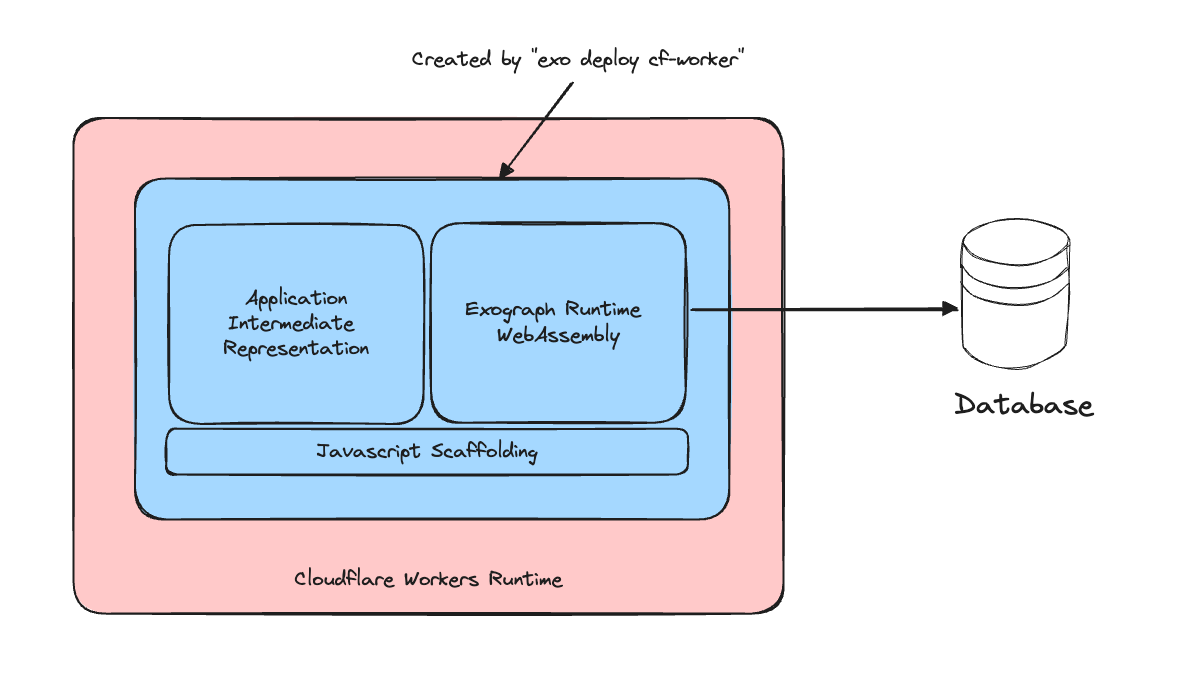
As for the developers using Exograph, we ship a WebAssembly binary distribution for exo-server, which provides bindings to the Cloudflare Workers runtime and implements a few optimizations that we will see in the next section. It also creates JavaScript scaffolding to interact with the WebAssembly binary.
Roadmap
Our current Cloudflare worker support is a preview. We are planning on adding more features and improvements in the upcoming releases. Here is a high-level roadmap:
- Improved performance: While the performance in the current release is already pretty good, especially with Hyperdrive, Exograph's ahead-of-time compilation offers more opportunities to improve it, and we will explore them.
- JS Integration: Exograph embeds Deno as the JavaScript engine, but that won't work in Cloudflare Workers. However, Cloudflare worker's primary runtime is JavaScript (WebAssembly is a guest), so we will support integrating Exograph with the host system's JavaScript runtime.
- Trusted documents: The current release doesn't yet support trusted documents, but we are working on it.
What's Next?
Exograph's WebAssembly target is a significant milestone in our journey to bring new possibilities to the Exograph ecosystem. But this is just the beginning. The next blog post will showcase another exciting feature due to this new capability. Stay tuned!
We are eager to know how you plan to use Exograph in Cloudflare workers. You can reach us on Twitter or Discord with your feedback. We would appreciate a star on GitHub!